
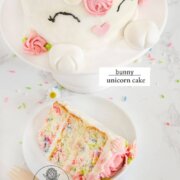

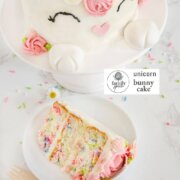
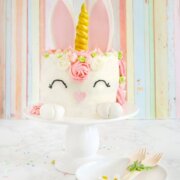
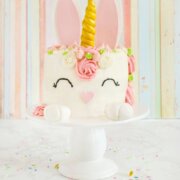
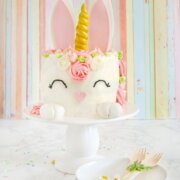
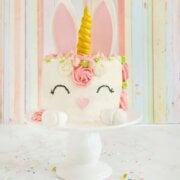
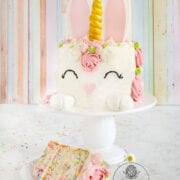
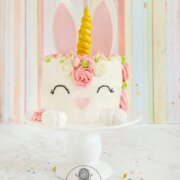
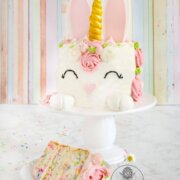
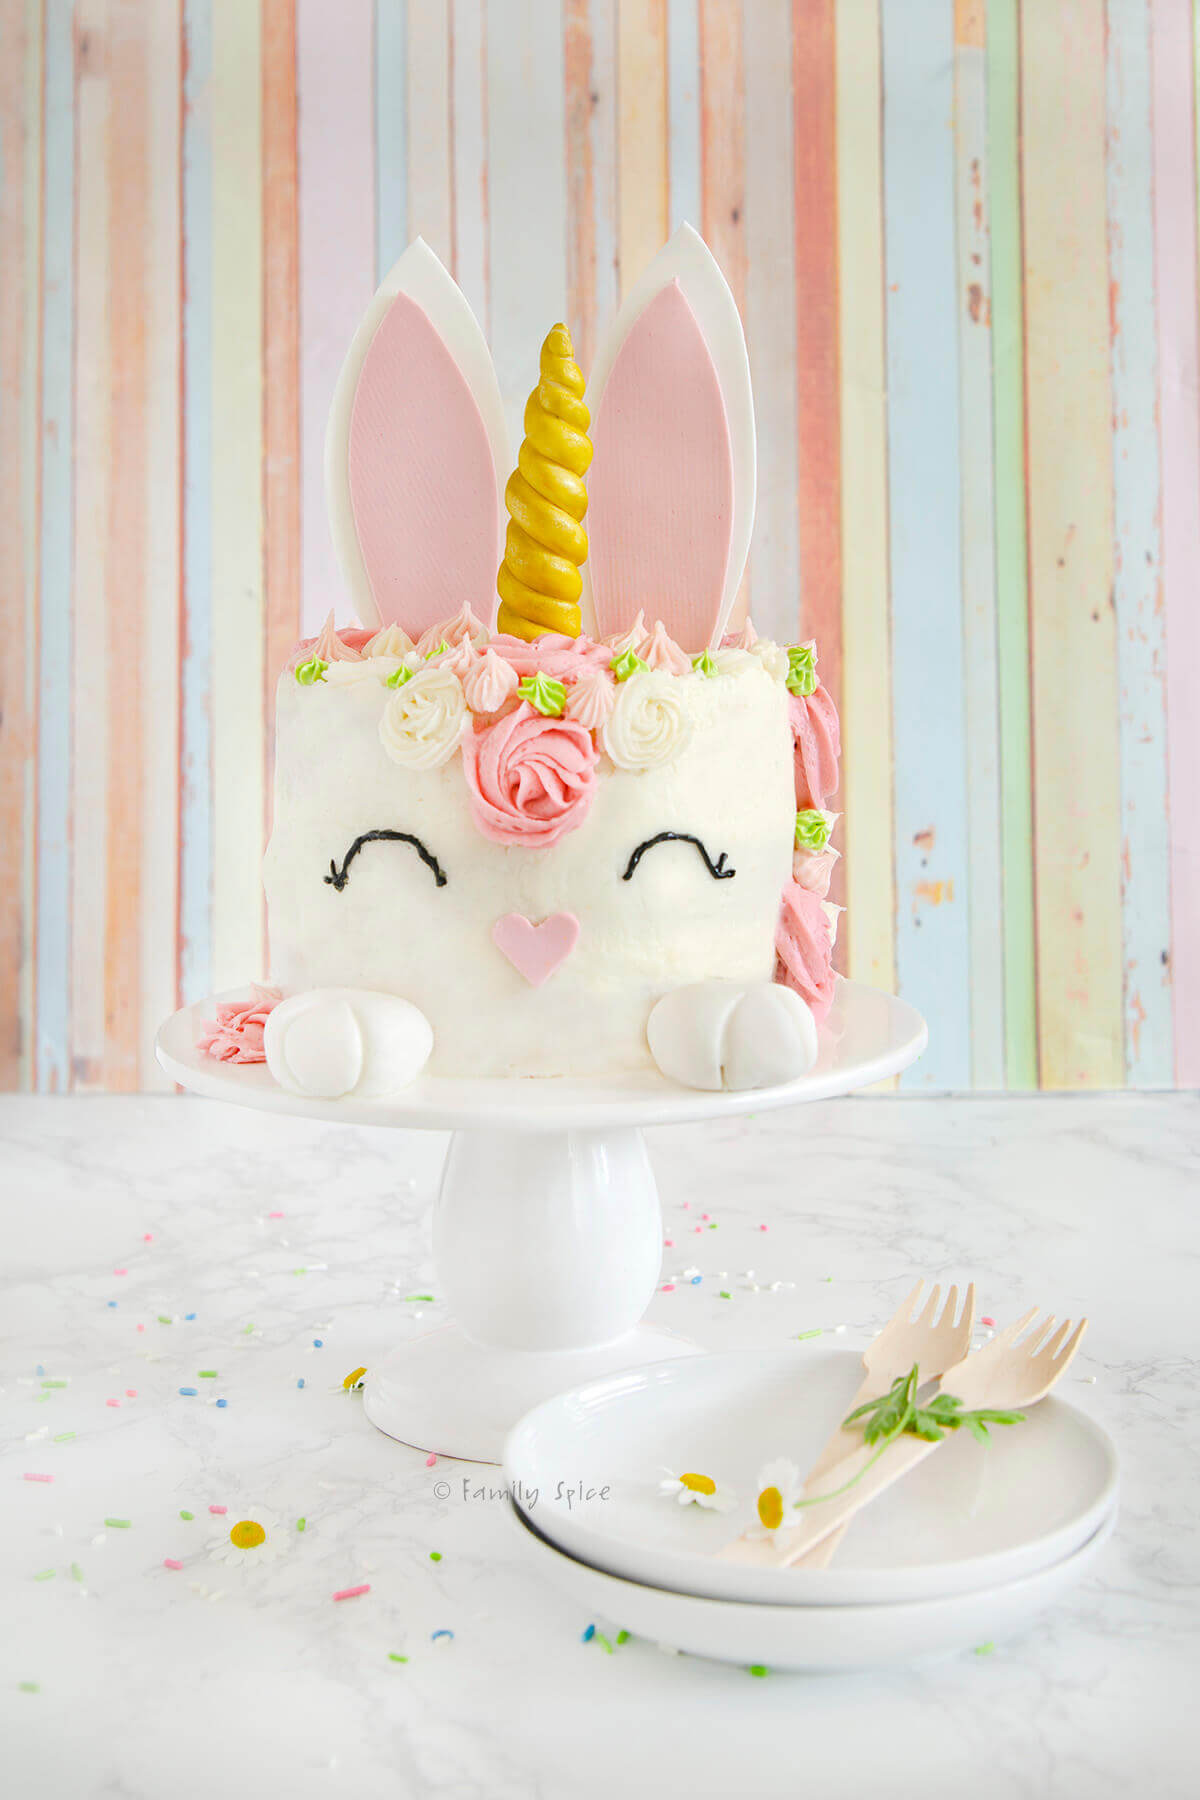
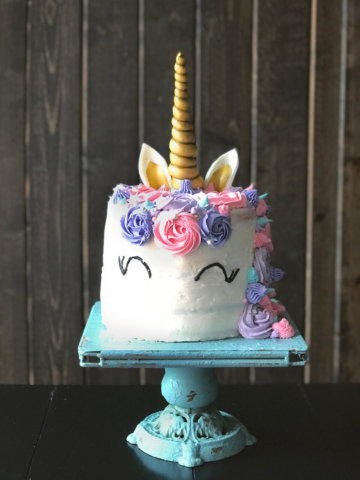
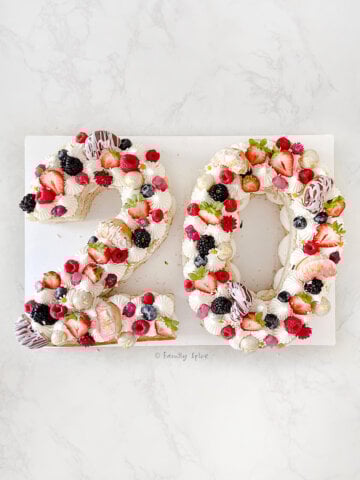
This unicorn bunny cake will be the star of your Easter celebration, but is also perfect for spring birthdays and baby showers too! You’ll bake this bunny cake with ease with step-by-step instructions and the simple funfetti cake mix.
Spring is in the air and I am so ecstatic! I much prefer the longer days to the longer nights. San Diego has been getting some nice rain this week, so we are doing a happy dance for our thirsty gardens. I can’t wait for all of the flowers to bloom.
Today’s cake is to celebrate spring and Easter coming in April. My 14-year old daughter and I are continuing our quest to make fun and unique unicorn cakes together to celebrate any and every season. It all started with her birthday unicorn cake.
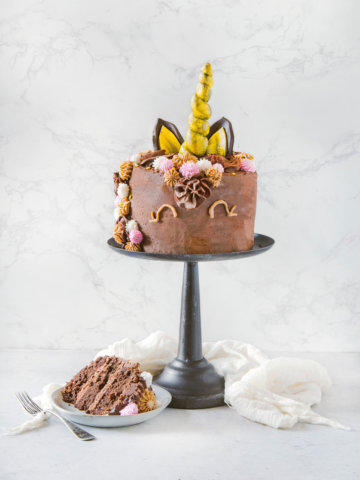
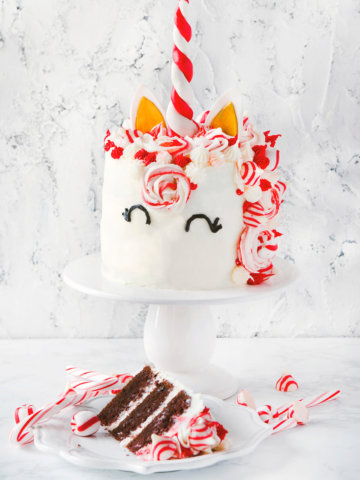
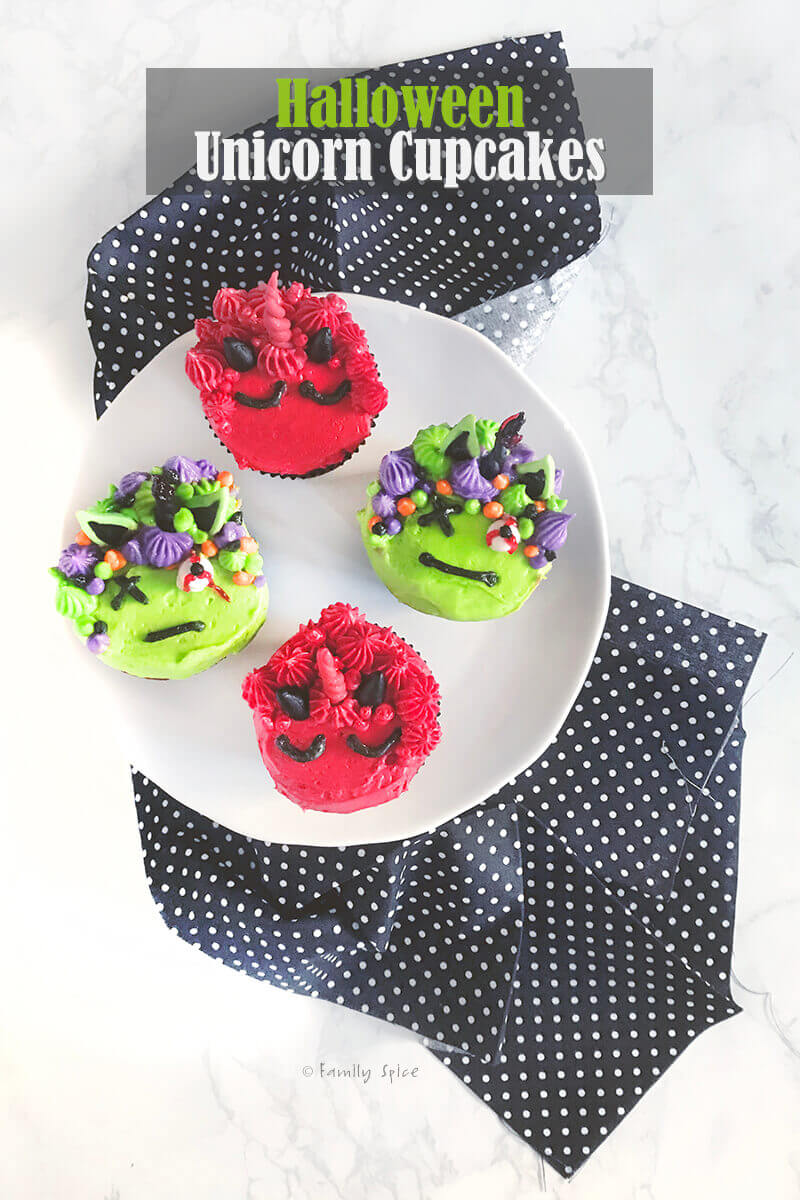
Then we made some fun halloween unicorn cupcakes. And for the holidays, we made a chocolate peppermint Christmas unicorn cake. I even made an all chocolate unicorn cake!
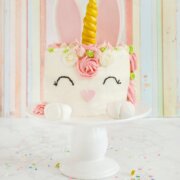
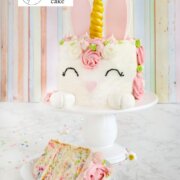
But I think we have a new favorite, this unicorn bunny cake.
Reader’s Reviews
“Scarlett wanted a bunny unicorn theme for her birthday so I was so excited when I found this adorable cake from @familyspice! It was a little touch and go at the beginning but, it’s true, there’s nothing a little frosting can’t fix. She loved it and I’m feeling pretty proud of my hand work!” — ncizzle via instagram
Jump to:
- Reader’s Reviews
- Why this recipe works
- Step 1: Bake the cake
- Step 2: Make the bunny ears
- Step 3: Make the unicorn horn
- Step 4: Paint your fondant gold
- Step 5: Make the bunny nose and feet
- Step 6: Assemble your cake
- Expert tips recipe FAQs
- Storing/Freezing Instructions
- Unicorn Bunny Cake
- Written by Laura Bashar
Laura says :
Why this recipe works
- Detailed Steps: I have made a variety of unicorn cakes over the years and kept track of every step with precise details and measurements. With each unicorn cake I have made, I fine tune the steps so you have all the answers right here.
- Customize: Just because I made a pastel bunny unicorn cake, doesn’t mean you have to follow my color scheme. Feel free to customize your cake to whatever colors your unicorn lover wants. The technique is the same.
- Budget Friendly: I have not priced out what a bakery would charge for creating a unicorn bunny cake, but I am pretty sure you can do it yourself at a fraction of the cost. And I used a box mix cake and pre-made fondant to help keep the cost down. If you plan ahead, use coupons and shop for the lowest prices, this cake won’t break the bank.
- Perfectly Imperfect: Whatever piping skills you may or may not have, if you take each step of the cake decorating process as a small feat to conquer, you can recreate this unicorn cake without completely going insane! And no one cares about any mistakes you may have made.

Step 1: Bake the cake
This post contains some affiliate links for your convenience (which means if you make a purchase after clicking a link I will earn a small commission but it won’t cost you a penny more)! Read my full disclosure policy
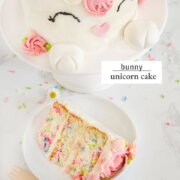
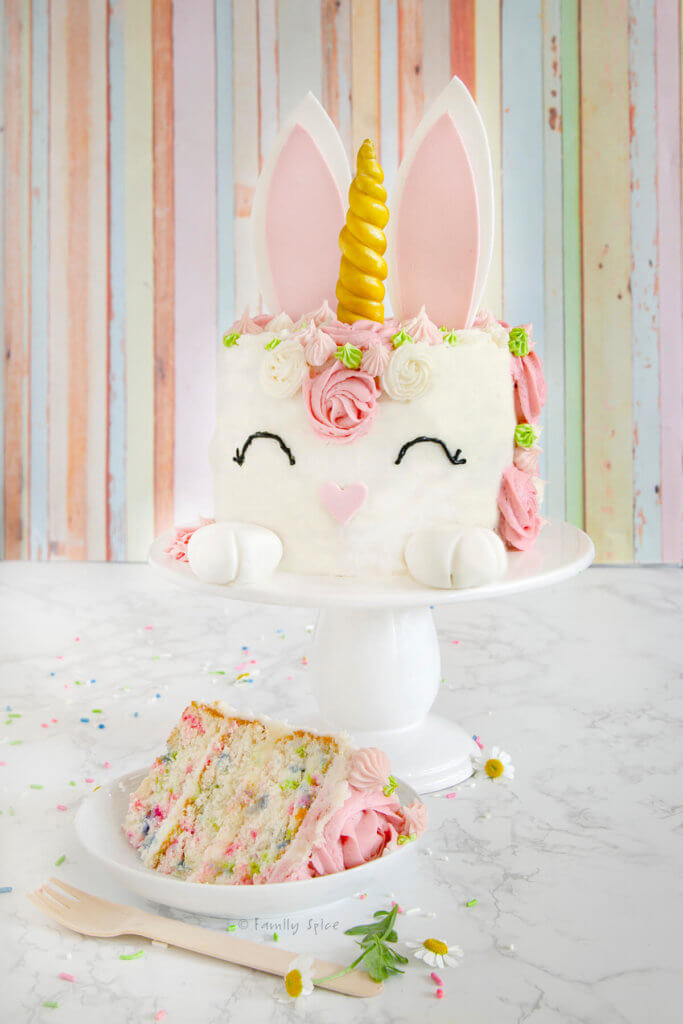
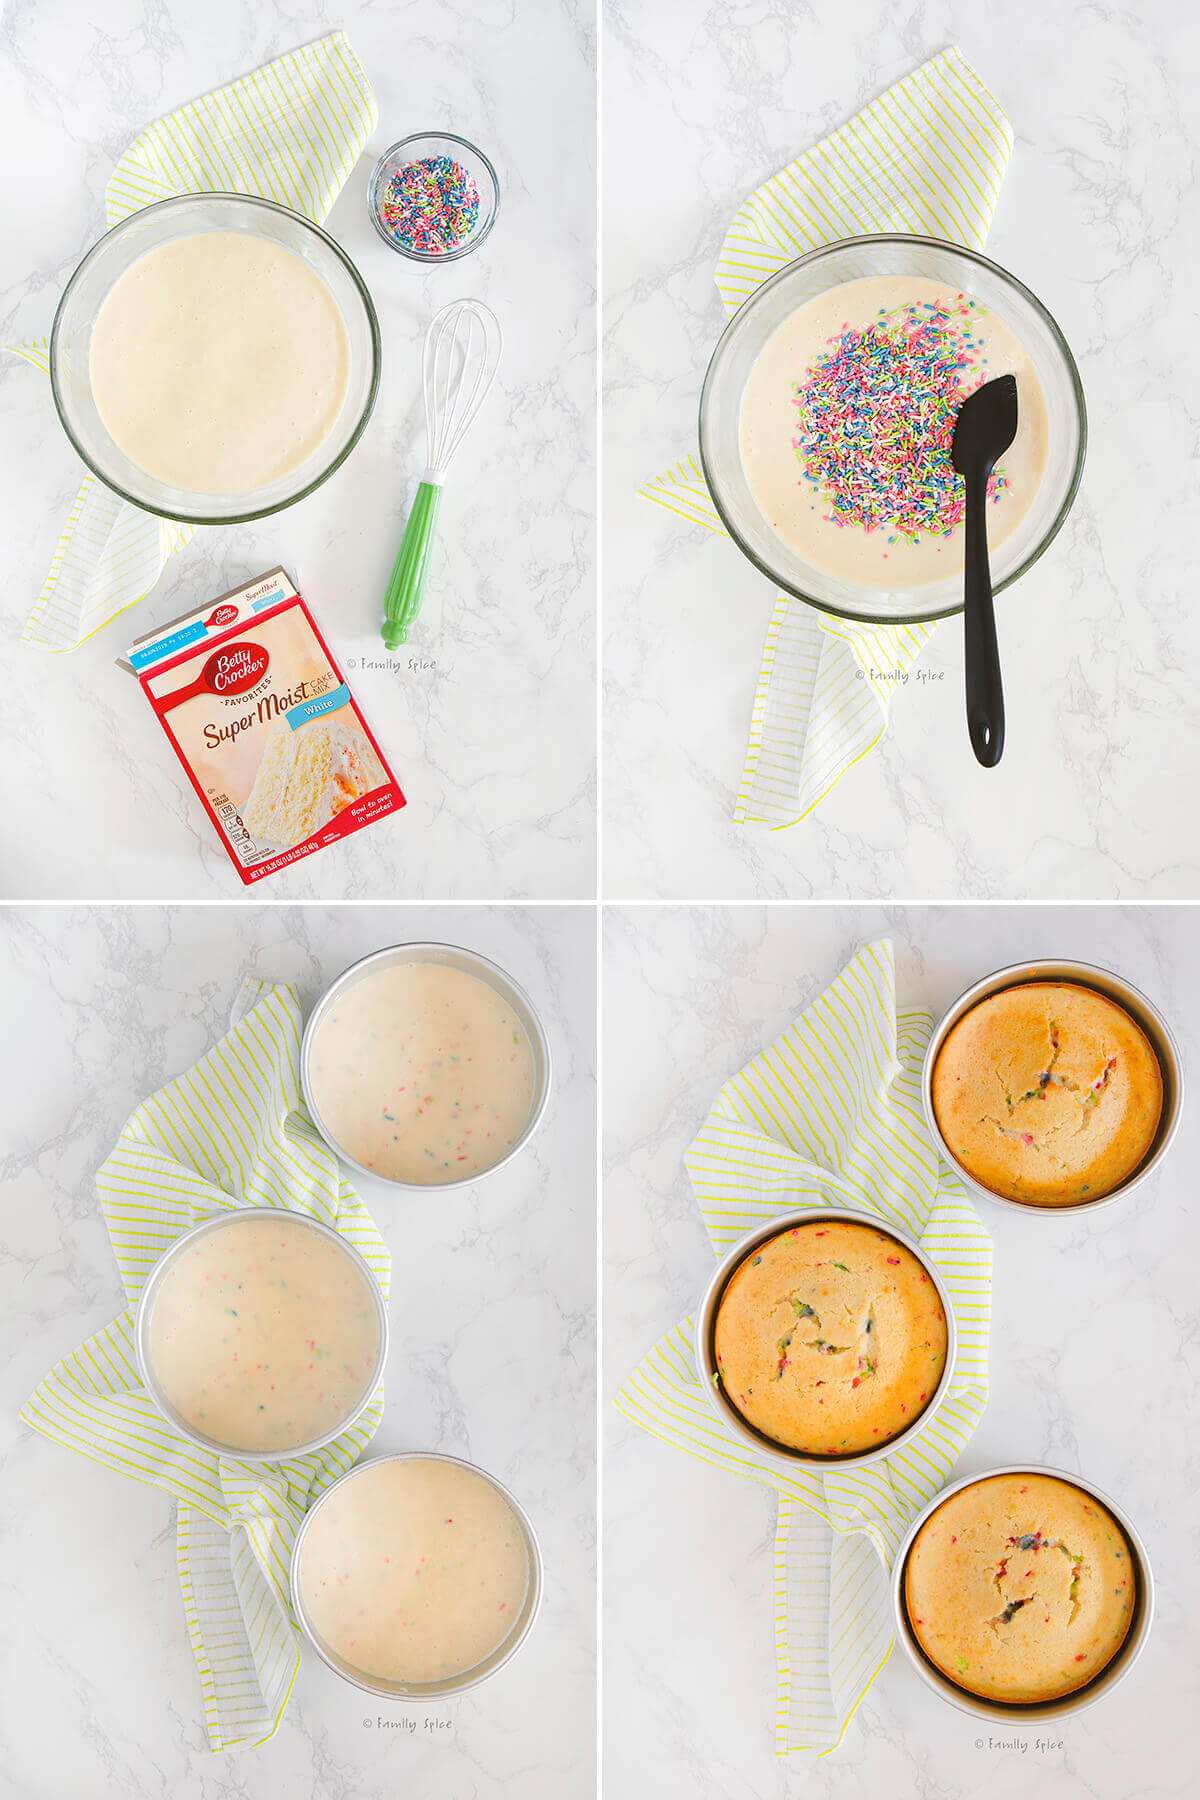
- Mix the batter. Follow the directions on your box and mix up one box of white cake batter. Add ½ cup bright jimmies to the batter.
- Divide batter. Divide batter into 3 greased 6-inch round cake pans lined with parchment paper.
- Bake the cakes. Bake the cakes until a toothpick inserted into the center comes out clean. Let the cakes cool completely before decorating.
I prefer to bake the cakes the day before I decorate them. This gives the cakes time to cool completely. Wrap the cakes in plastic wrap and keep chilled in the refrigerator. Cold cakes are easier to frost than warm ones.
Step 2: Make the bunny ears
For my previous unicorn cakes, I usually only worked with fondant. For this bunny unicorn cake, I knew that I wanted everything on the cake to be edible including the big bunny ears.
Fondant is softer as an edible sculpting medium and doesn’t dry as quickly or as hard as gum paste. If I wanted my bunny ears to stand up on their own, I needed to make them out of gum paste.
If your gum paste is too hard to work with, massage it out with a little shortening. After several attempts, I found that by dipping my fingers into the shortening and working it into the gum paste was the best method to making it smooth and pliable.
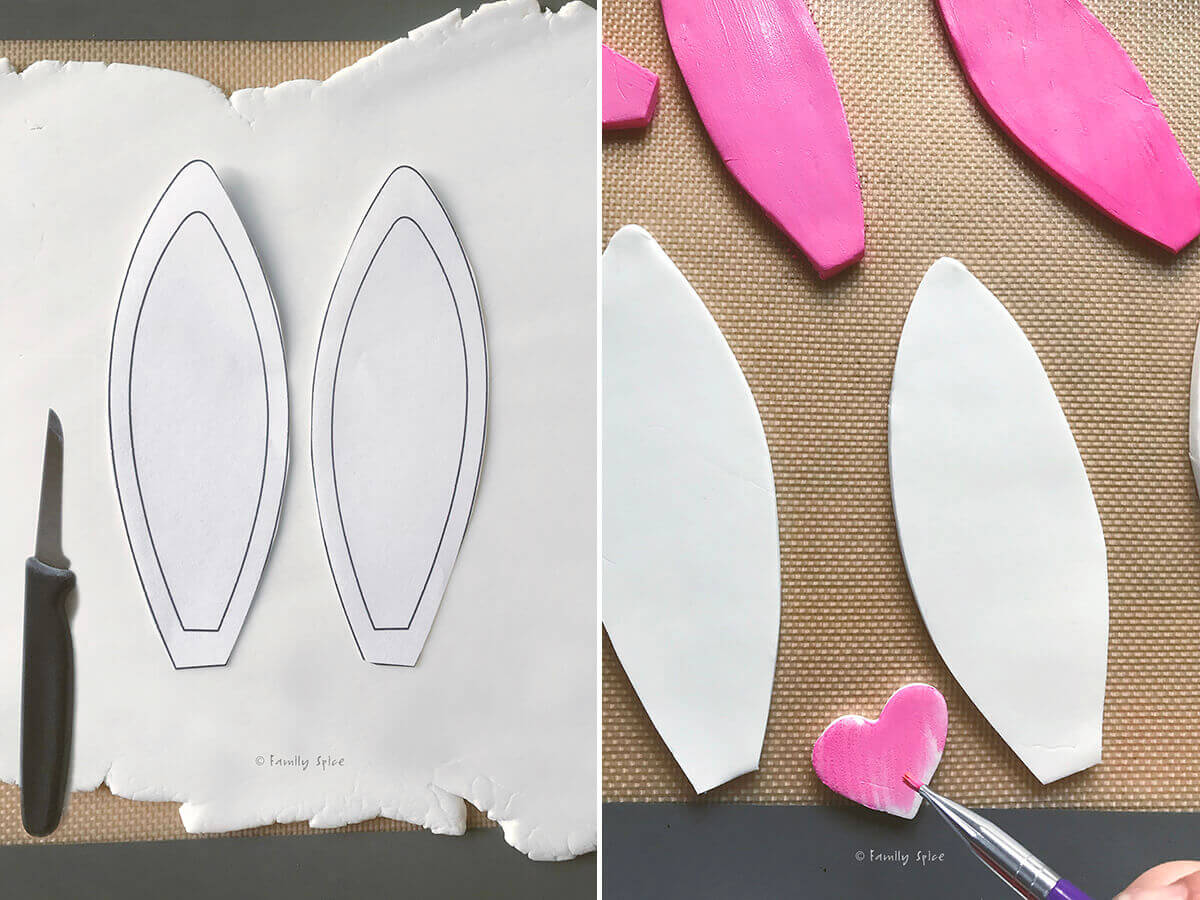
- Roll out the gum paste. Using a fondant rolling pin, roll the gum paste to the thickness of less than ¼ cm. I have this free bunny ear template you can print out, which works perfectly for the 6-inch round 3-layer cake, as pictured in this post. If you are making a bigger cake, like an 8-inch or 9-inch round cake, print the bunny ear template at 115% and you’ll be set.
- Cut out the outer ears. Use a sharp tip knife and smoothly trace the ear template to cut out your ears. Let it sit overnight on a silicone lined baking sheet so it can harden.
- Pink inner ears. If you paint the inside of the bunny ears with food coloring, be sure to dilute it first. My first attempt was super bright! Instead, I worked in some pink and brown food coloring (I use these Wilton color right food dyes) into the white gum paste to get the light pink color I wanted.
- Cut out the inner ears. Once the pink gum paste was ready, I again rolled it out thin and traced and cut out the inner ear. I then adhered the pink inner ear onto the bigger white outer ear using some gum paste glue.
Gum paste glue is simply a couple of tablespoons of hot water mixed in with some gum paste. You want a consistency of syrup or thin jelly.
- Glue the ear pieces together. Spread a little gum paste glue on the back of the pink inner ear and place it on top of the white outer ear. Let it sit overnight to completely dry and harden.
Step 3: Make the unicorn horn
You can definitely use gum paste to make the horn, but since I devoted all my gum paste to the bunny ears, I used some leftover white fondant to make the unicorn horn.
Since this is a bunny unicorn and not an ordinary unicorn, my daughter and I agreed that we needed a slightly shorter horn than we usually make. We also decided that the horn should be shorter than the ears. Once finished, the final horn od about 3-4 inches long.
I recommend making the unicorn horn the day before since it is made with fondant and needs to dry and harden.
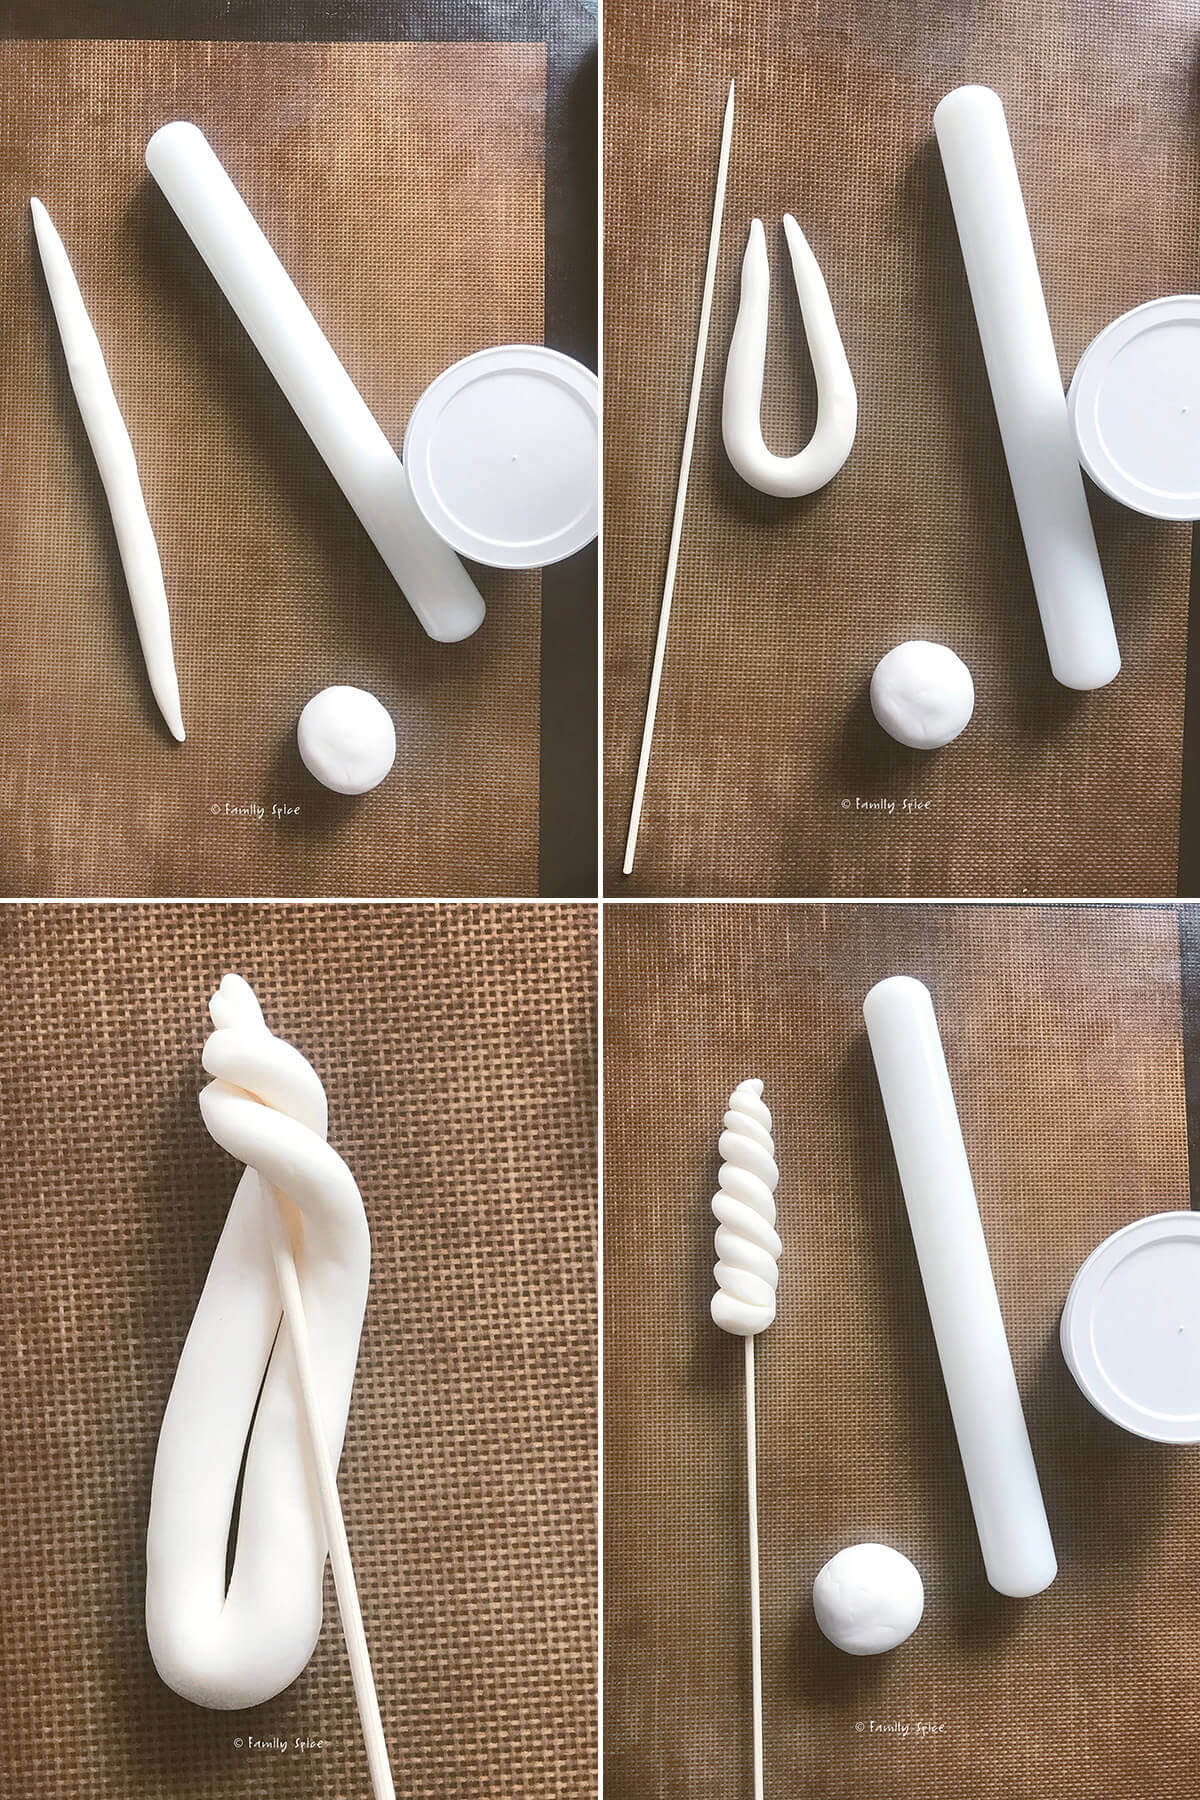
- Roll out the fondant. For the unicorn horn, you will need a 1-inch ball amount of fondant. Roll the fondant out on a silicone mat or flat work surface dusted with powdered sugar.
- Form a log. Roll it into a log about 8.5-inches long where the ends are thinner. Start by rubbing your ball of fondant between your two hands until you have a nice log forming. Then add more pressure on the ends to taper them.
- Wrap the horn. Loosely fold the fondant to make a ‘U’ and gently twist the tips together. Wrap the whole thing down a bamboo skewer. Be careful and don’t over squish the fondant as you don’t want fingerprint impressions on the horn.
- Let it dry overnight. Stick your unicorn horn somewhere safe to dry out. It can be in a glass, a vase or in a big piece of styrofoam. When your fondant horn has hardened, you can paint it.
If you have your kids helping, this is a fun project for them. They have years of play-doh and slime experience behind them so don’t be surprised if they roll out a beautiful unicorn horn better than you!
Step 4: Paint your fondant gold
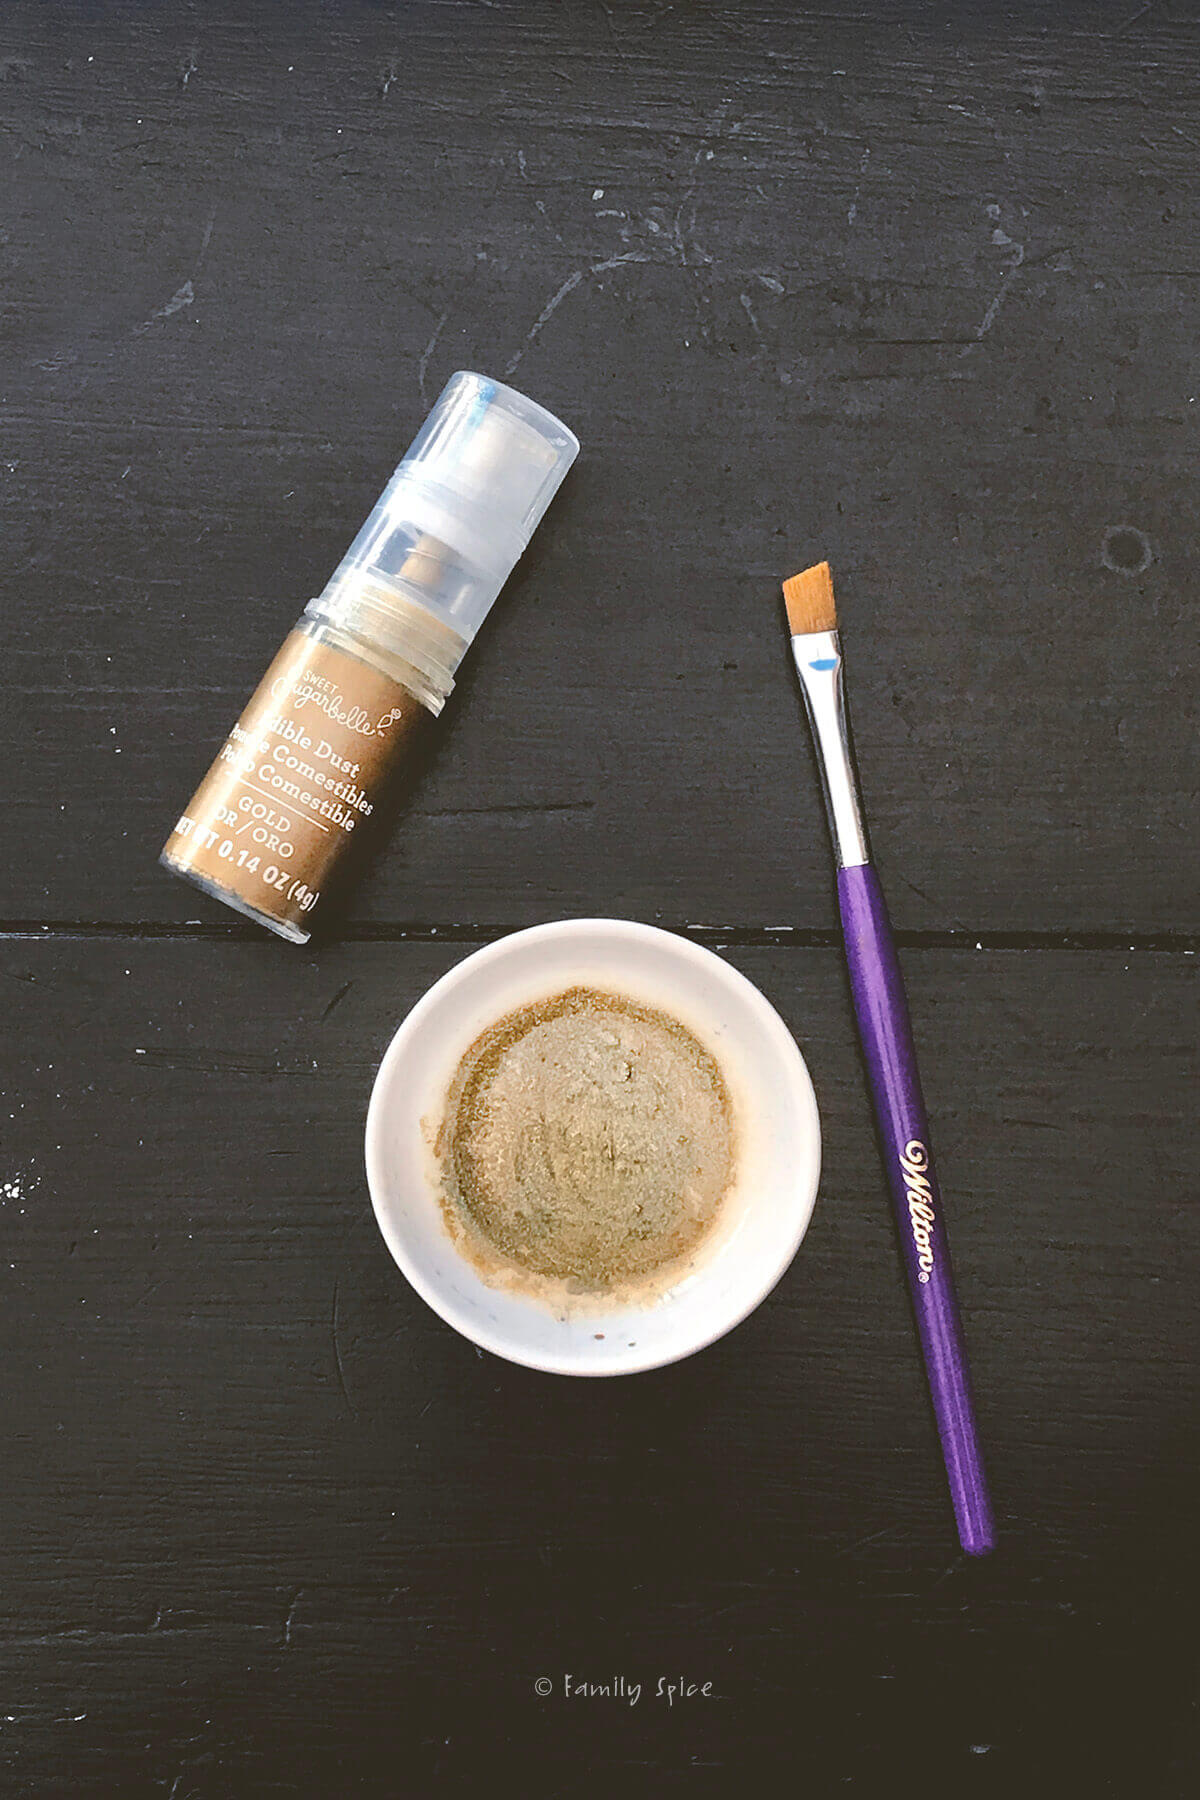
- Make the gold paint. Add a teaspoon of edible gold powder into a small bowl with a few drops of vodka, peppermint or almond extract. The alcohol evaporates as the gold paint dries, keeping the gold adhered to the fondant.
- Paint your fondant. Use a brand new paint brush or one that is exclusively used for food. Simply paint your fondant unicorn horn with the edible gold paint and let it sit for a couple hours (or up to overnight) to dry completely.
Want to save this recipe?
Step 5: Make the bunny nose and feet
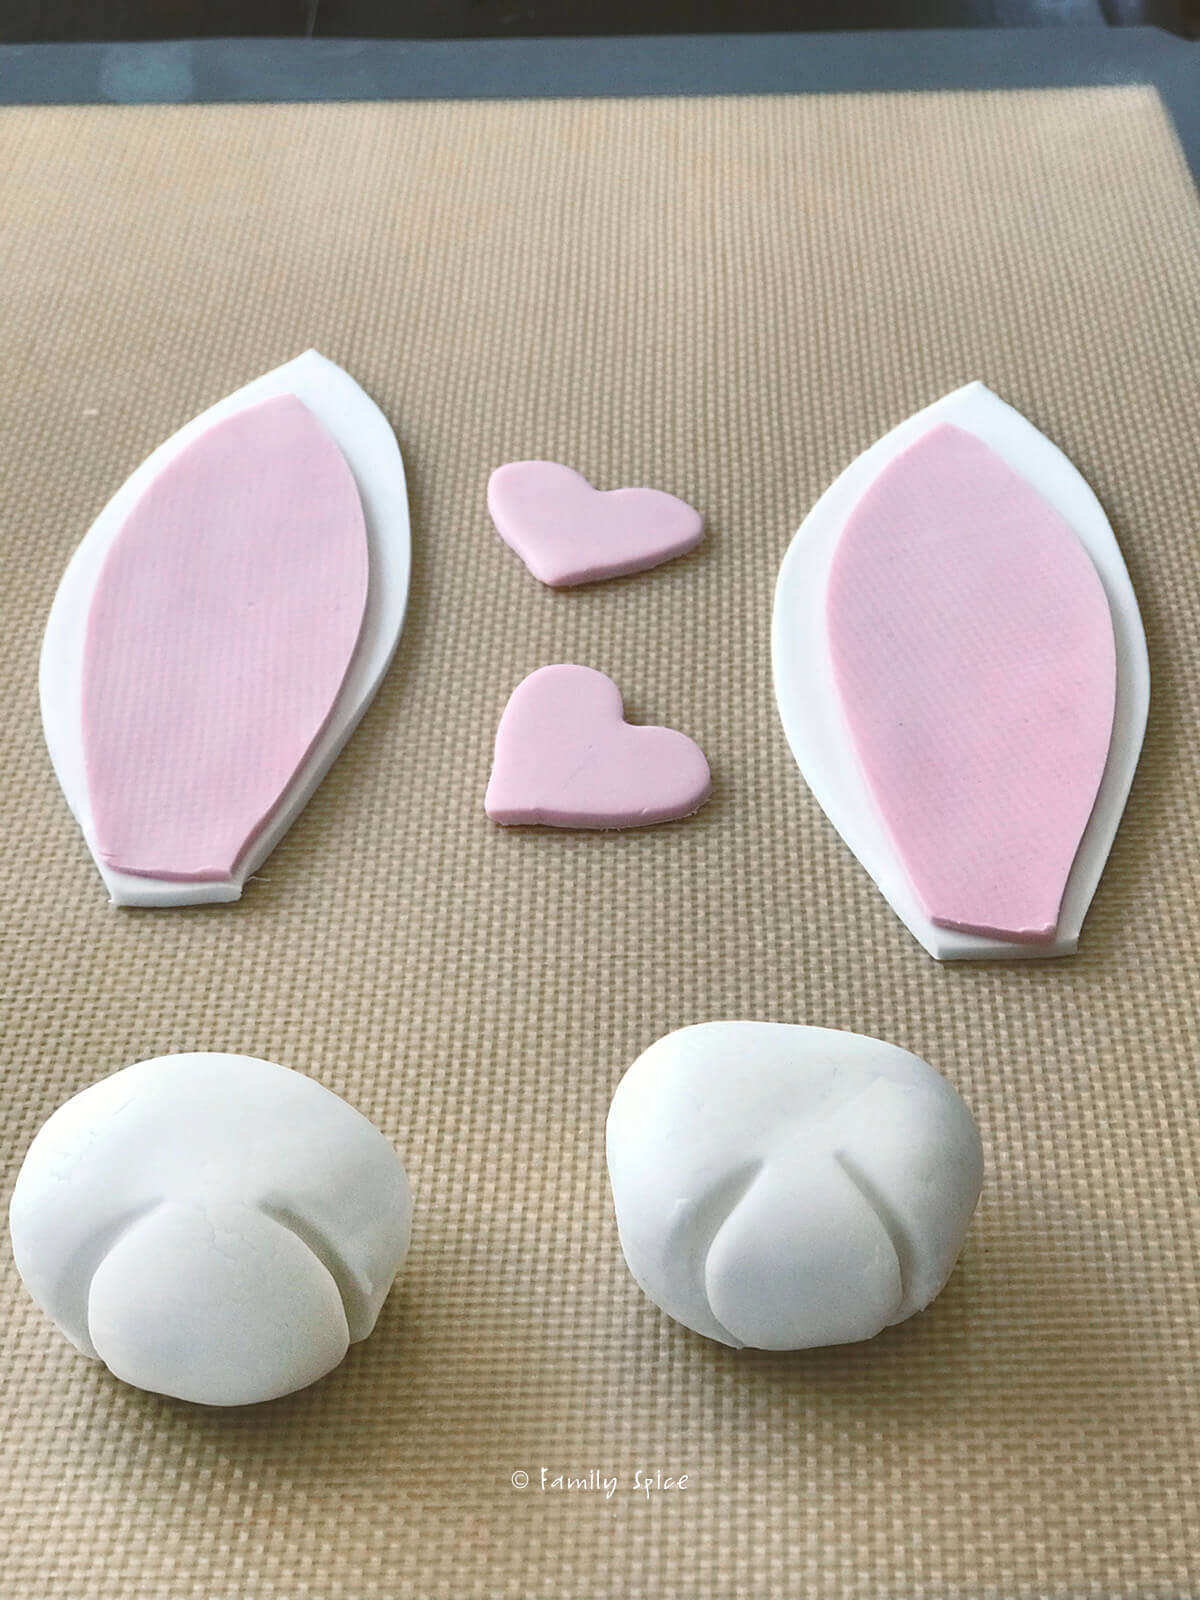
With the remaining pink gum paste, I rolled out and cut a small heart using my template (it’s with my free bunny ear template). Because I had gum paste, I used that to shape the paws. You can also use fondant.
The hardest part was keeping the paws smooth and crease free. It took several tries before I figured it out – and lots of shortening!
- Work the gum paste. For each paw, use a golf ball sized amount of gum paste and work it with shortening until it was smooth.
- Flatten it. Roll it out and gently press it to make a fat circle. You can also flatten it between your hands, but I found using the roller kept it smooth.
- Make a ball. Bring in all of the edges to the center of the circle, as if making a stuffed dumpling. Smooth everything over and form it into a ball. Turn it over, seam side down, and the top of your “dumpling” should be nice and smooth.
- Form the feet. Gently press it down so the seam side is flat and smooth. Using a fondant sculpting tool, make indentations to form the toes of the bunny feet. You can also use a dull butter knife.
- Let it dry overnight. Smooth everything over and let your bunny paws sit overnight to harden.
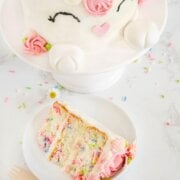
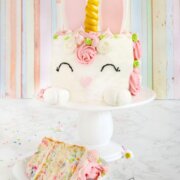
Step 6: Assemble your cake
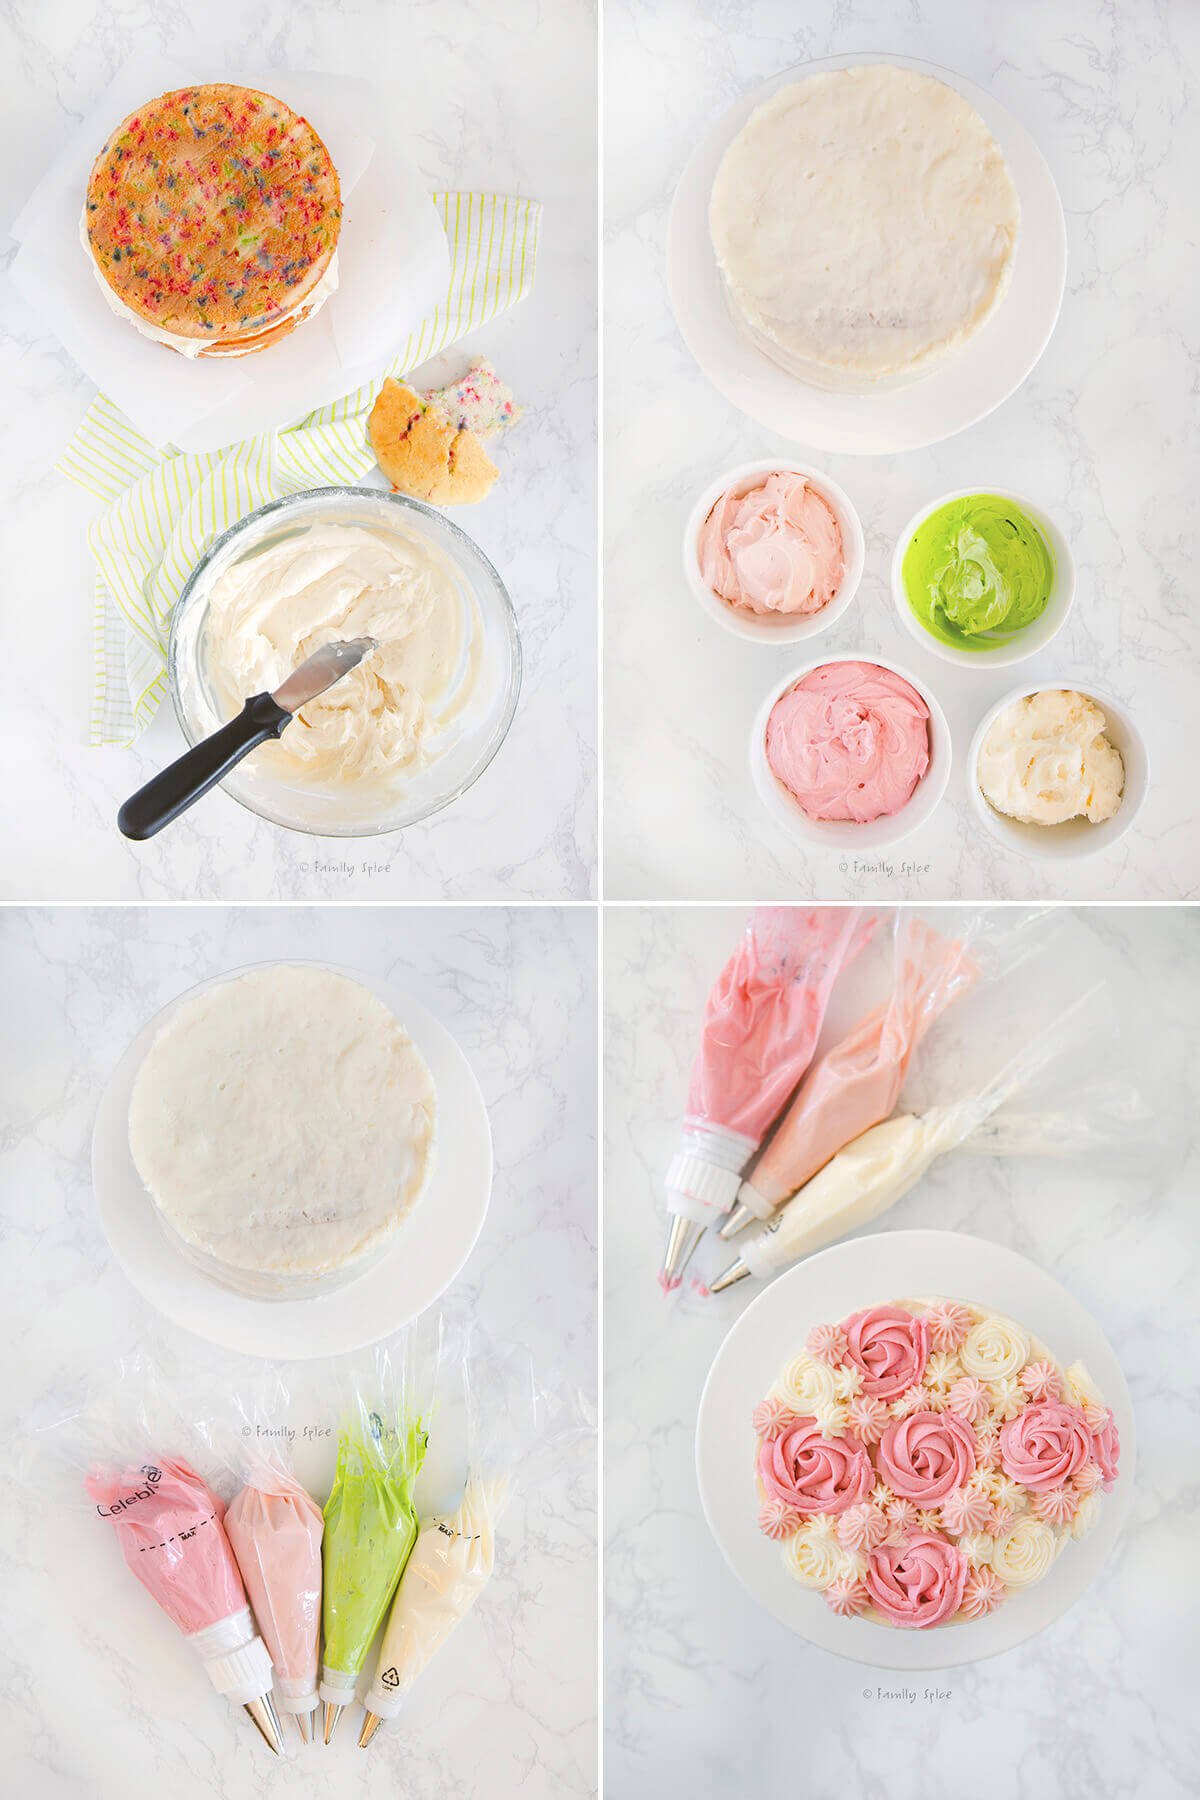
- Flatten the layers. Using a serrated knife, cut the domed tops from each of your cake layers to flatten them.
- Assemble the bottom layers. Add a dab of frosting on you cake stand and lay your bottom layer down. I typically flip the cake over so the bottom of the cake (the flattest surface) is facing up. Cover with white frosting.
- Assemble the layers. Add the next layer of cake and top with frosting, continuing until all the layers are on top of each other.
- Frost the sides. Either with a piping bag or offset spatula, add frosting to the sides of the cake. Smooth out the sides and top of the cake. I find that using a rotating cake stand and acrylic scraper helps create a smooth professional looking frosted cake.
- Chill the cake. Let the cake chill in the refrigerator for a few hours to help the frosting set.
While the cake chills, add your desired food coloring to an additional 4-½ to 5 cups of white frosting. This is for the unicorn mane. I made more frosting than I needed, but again, I wanted to be sure I did not run out.
I used dark pink, light pink, white and light green for the mane, and black for the eyes. Be sure to have plenty of piping bags, small piping couplers and large piping couplers.
- 1 ½ cups dark pink frosting, dyed using 5-6 drops of pink and 1 drop of brown, in a decorating bag fitted with a #1M tip
- 1 cup light pink frosting, dyed using 1-2 drops of pink and less than 1 drop of brown, in a decorating bag fitted with a #32 tip
- 1 cup light green frosting, dyed using 5-6 drops of yellow and 1 drop of blue, in a decorating bag fitted with a #18 tip
- 1 cup white frosting, in a decorating bag fitted with a #21 tip
- 2-3 tablespoons black frosting, in a decorating bag fitted with a #4 tip or in a resealable bag with a corner slightly snipped off
I use Wilton’s color chart here to help me with the color mixing using their food color dyes.
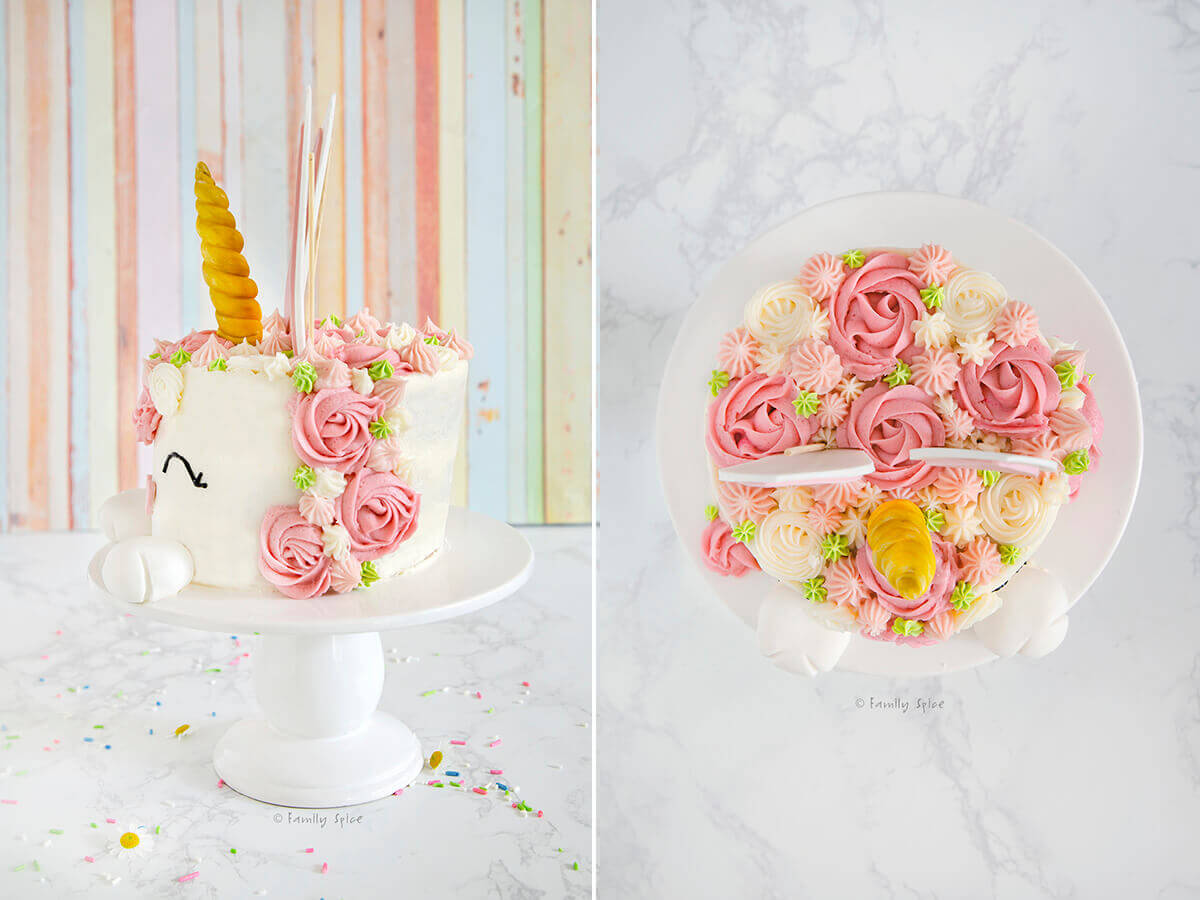
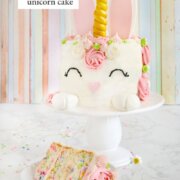
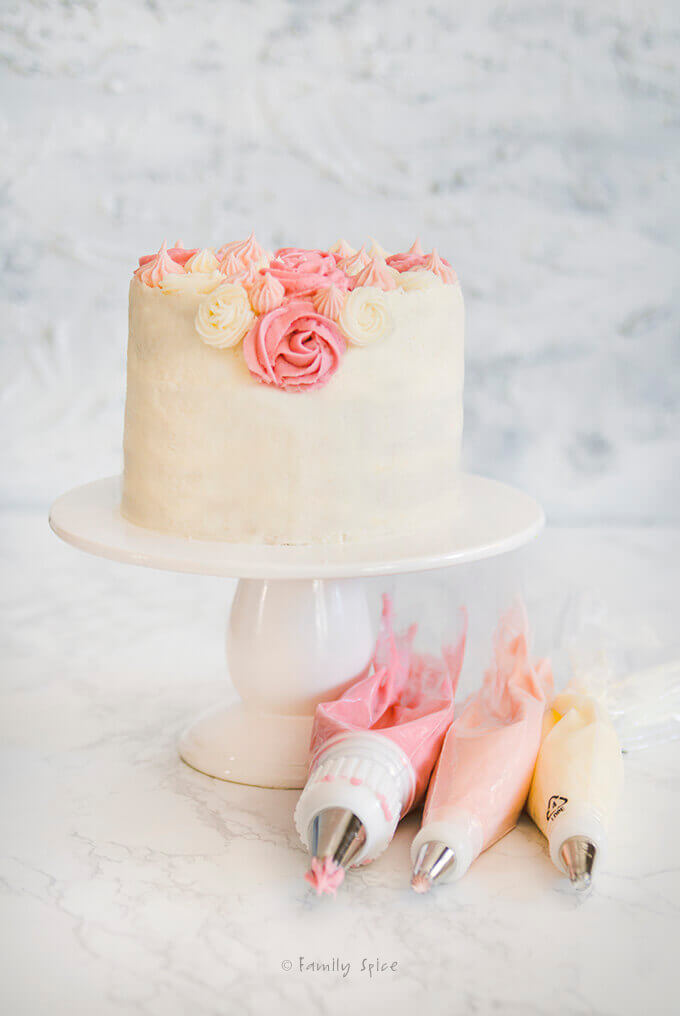
- Start at the top. To keep things symmetrical on top, start by piping four large rosettes in dark pink along the top of the cake edge, equidistant from each other. Pipe another rosette in the center.
- Pipe the forehead. Pipe one large dark pink rosette on the side of the cake where the bunny unicorn forehead is located.
- Pipe the mane. Pipe 2 or 3 large rosettes down the side of cake where the mane will drape down.
- Fill in the gaps. Add dollops of stars and smaller rosettes using the white and light pink frostings, filling in the big gaps. Add small stars using the green frosting.
- Pipe the eyes. Using the black frosting and tip #3, pipe the eyes onto the front center of the cake, just under the forehead rosette.
- Add horn and ears. Press the horn into the top center of the cake and the bunny ears on either side and behind the horn. If your ears are having a hard time staying up straight, insert bamboo skewers behind them as support.
- Add nose and paws. Add a smidge of frosting behind the heart nose and place below and in between the eyes. Add a dollop of frosting underneath each bunny paw and adhere them to the cake stand, below each eye. Add any final touches of frosting.
Expert tips recipe FAQs
Overall, my daughter and I were super excited and proud of our Easter bunny unicorn cake. It really does scream ‘spring’ with it’s happy pastel colors. My friends thought it would make a cute baby shower cake, too.
If you are looking for something less labor intensive for your next birthday party, I have a list of fun and easy birthday cakes that are budget friendly and require less skills than this unicorn cake to assemble! How about a barbie cake?!
And I have another spring cake that is perfect for Nowruz or Easter.
Storing/Freezing Instructions
TO STORE: If your cake is frosted, I suggest storing any leftovers in an airtight container and refrigerate for up to 5 days. If unfrosted, you can keep it covered on the counter for up to 3 days or refrigerate for longer.
TO FREEZE: You can also freeze leftovers. Wrap in foil, parchment paper or plastic wrap and freeze for up to 4 months.

If you are enjoying my recipes, please sign up for my newsletter and get my free 28-day meal plan! You can also follow me on Instagram or Facebook.

Unicorn Bunny Cake
Ingredients
Cake Ingredients
- 1 box White Cake Mix
- 3 large egg whites
- 1 ¼ cup water
- ⅓ cup extra virgin olive oil
- ¼ cup colorful jimmies/sprinkles
Frosting Ingredients
- 1 cup cream cheese
- 1 cup unsalted butter softened
- 8 cups confectioners’ sugar approximately 2 lb.
- ¼ cup heavy cream
- 2 teaspoon vanilla extract
Other Ingredients
- 2 oz white fondant
- 6 oz gum paste
- ¼ teaspoon edible gold powder
- ⅛ teaspoon peppermint extract
- Pink food coloring
- Brown food coloring
- Yellow food coloring
- Blue food coloring
- White food coloring optional
- Black food coloring
- Shortening to work into gum paste
Instructions
Bake the cake
- Preheat oven to 350ºF.
- Mix up one white cake mix batter per package directions into mixing bowl.
- Divide batter into 3 6-inch cake pans, coated with oil and lined with parchment paper.
- Bake cakes until toothpick inserted into center of cake comes out clean, about 25-30 minutes. Let cakes cool completely on wire racks.
- Do not begin frosting the cake until the cakes are completely cooled.
Make the gum paste bunny ears and nose
- Massage gum paste, rubbing shortening into your fingers repeatedly until gum paste is easy to shape and smooth.
- Using a small rolling pin, roll out the gum paste flat, about ¼-cm thick. Using the bunny ear templates that I provided, cut out the larger outer ears using the tip of a sharp knife.
- Use an offset spatula to transfer to a baking sheet holding a silicone mat.
- Separate about ¼ of the remaining gum paste. Keep the remaining gum paste covered in plastic wrap.
- Using a toothpick, work in a few streaks of pink and 1 or 2 streaks of brown food coloring into the gum paste. You want a light pink color.
- Massage the gum paste until the gum paste is pink throughout,
- Roll out it out flat, about ¼-cm thick. Using the bunny ear template, cut out the smaller inner ears using the tip of a sharp knife.
- Transfer to the baking sheet.
- Roll out the pink gum paste again and cut out the small heart nose, also on the bunny ear template.
- Transfer to the baking sheet.
- To make gum paste glue, grab a small pinch of white gum paste, like a ¼ teaspoon ball and mix it in a bowl with 2 TBS hot water. You want a syrupy, gel like consistency.
- Brush the gum paste glue behind the pink inner ear then place it on top of one the big white outer ears. Repeat with other pink inner ear. Discard remaining gum paste glue and let ears completely dry overnight.
Make the gum paste bunny paws
- Roll out the remaining white gum paste, again working with the shortening until smooth and soft.
- Divide the gum paste in half. You need 2 balls, about the size of a golf ball. Discard anything extra.
- Working with one ball at a time, roll in a smooth ball using shortening, Keep the other ball covered in plastic wrap.
- Using a small rolling pin or your hands, gently flatten the ball as you would with play-doh. Keep it thick, like pizza dough.
- Start gently folding in the circle, bringing the edges of the circle to the center. You want to form a smooth ball.
- Work the seams together, rolling into a ball that is smooth and seamless on top, and the seams underneath.
- Turn the ball over, seam side down, and gently press down on a hard surface to slightly flatten the ball.
- Using a dull butter knife or fondant sculpting tool, press indentations into the dough to form lines shaping the toes of your bunny.
- When satisfied with your creation, place on the baking sheet to dry overnight and create second bunny paw with remaining gum paste.
Make the fondant unicorn horn
- Mix a few drops of peppermint extract into edible gold dust to form gold paint.
- Work the white fondant until smooth, using shortening as you need it.
- Roll out fondant into a log where the ends are tapered and thinner than the center. It should be approximately 3.5-inches long.
- Gently fold the log to shape a ‘U’ and wrap the tips together.
- Begin wrapping the fondant around a bamboo skewer, starting with the thinner parts of the fondant at the tip of the skewer and ending with the fatter ends.
- Gently slide the rolls together up the skewer to remove any gaps.
- You will only need about 3-inches of bamboo stick to place in your cake, so cut off any remaining parts of the bamboo stick, past this 3-inch mark.
- Paint your unicorn gold using the gold paint you make. Allow the fondant horn to sit overnight UPRIGHT to harden and dry.
Make the frosting
- In a stand mixer or using a hand mixer, combine butter and cream cheese and whip until smooth.
- Mix in powdered sugar, one cup at a time.
- Gently pour in the heavy cream and vanilla extract and blend until smooth.
- Cut any domes from the top of the cakes to level them off, then place first layer of cake on a cake stand, adhered with a dab of frosting.
- Using an icing spatula, smooth over a layer of frosting, then top with second cake layer.
- Again, smooth over a layer of frosting then add top cake, inverting it so bottom of cake is facing up.
- Smooth top of cake and surrounding sides with white frosting.
- Place in refrigerator to chill.
- Place approximately 1.5-cup of frosting in a small bowl and dye it dark pink, using pink and brown dye. Transfer to a piping bag fitted with tip #1M.
- Place approximately 1-cup of frosting in a small bowl and dye it light pink using pink dye. Transfer to a piping bag fitted with tip #32 or any star or open star tip.
- Place approximately 1-cup of frosting in a small bowl and dye it light green using yellow, blue and white (if needed) dye. Transfer to a piping bag fitted with tip #18 or any star or open star tip.
- Dye about 3 TBS of frosting black using black dye. Transfer black frosting to a piping bag fitted with tip #3.
- Reserve 1 cup of frosting and do not dye it anything. Transfer to a piping bag fitted with tip #21 or any star or open star tip.
Assemble the unicorn cake
- Using the dark pink and #1M piping tip, pipe one large rosette on the side of the cake where the bunny unicorn forehead is located.
- On the top of the cake pipe four large rosettes marking the four tips of the cake (like a compass!). Pipe another rosette in the center.
- Pipe 2 or 3 rosettes down the side of cake where the mane will drape down.
- Add dollops of stars and smaller rosettes using the white and light pink frostings, filling in the big gaps.
- Add small stars using the green frosting.
- Pipe eyes onto the front center of the cake, just under the forehead rosette using the black frosting and tip #3.
- Place horn on the top center of the cake and the bunny ears on either side of the horn. If your ears are having a hard time staying up straight, insert bamboo skewers behind them as support.
- Add a smidge of frosting behind the heart nose and place below and in between the eyes.
- Add a dollop of frosting underneath each bunny paw and adhere it to the cake stand, below each eye.
- Add any final touches of frosting, piping rosettes and stars next to bunny paw opposite of the long mane.
- Refrigerate until ready to serve.
Notes
Nutrition
Nutrition Disclaimer
Nutritional information is an estimate provided to you as a courtesy. You should calculate the actual nutritional information with the products and brands you are using with your preferred nutritional calculator.
PS If you try this recipe, why not leave a star rating in the recipe card right below and/or a review in the comment section further down the page? I always appreciate your feedback.
You can also follow me on Pinterest, Facebook or Instagram. Sign up for my eMail list, too!
Written by Laura Bashar
Hi, I’m Laura, a certified professional cook and cookbook author living in San Diego. I have been sharing my family’s favorite recipes inspired from all over the world since 2008. Let’s cook up something fun!

Can I have one bunny unicorn cake pleas
Spectacular looking cake! Love the way you decorated it. Bet it tastes mighty good, too. 🙂
Thank you, John! My daughter and I had fun with it! And it did taste dangerously good!
Laura
Holy moly – you have me believing I can do this! Incredible cake and directions!
Such a precious and, well…fun!…cake! I have really enjoyed all the different unicorn cakes and cupcakes you’ve made so far. Keep them coming!
Thank you, Jenni! They certainly are FUN to make!
This is the cutest idea and I love your step by step directions.
Thank you, Sandi! I do my best to break things down into simple steps.